Peel ply is very easy to work with as long as you're only using it on flat surfaces. The hull sides and topsides are all fiberglassed before assembly and using peel ply makes this a one step process. No sanding and no "weave filling". Peel ply will NOT work for curved areas as it isn't like fiberglass and doesn't conform to corners or curves very well.
The process is very simple. After wetting out the fiberglass simply lay the peel ply over the glass and use a squeegee to press the ply down on the glass. There should be no bubbles or dry spots when you're finished. After the epoxy has set up simply peel off the peel ply. It leaves a nicely textured surface that is ready to take primer or paint. No muss no fuss no sanding.
Bill

PocketShip.net
For sailors and boatbuilders interested in PocketShip
Need help breaking the "fiberglass code"
Moderator: John C. Harris
Forum rules
Spam or commercial posts will be deleted.
This is a civil forum: no flames or drunken tirades.
Please stay on-topic.
PocketShip's Web Page: http://www.clcboats.com/pocketship
If you need CLC customer service: http://www.clcboats.com/forms/contact_us.html
We'll try to delete spam as soon as it appears.
21 posts • Page 2 of 3 • 1, 2, 3
Re: Need help breaking the "fiberglass code"
![]() by Shudoman on Tue Feb 28, 2012 3:04 pm
by Shudoman on Tue Feb 28, 2012 3:04 pm
- Shudoman
- Posts: 144
- Joined: Sun Feb 15, 2009 10:31 pm
Re: Need help breaking the "fiberglass code"
![]() by arnie on Mon Sep 03, 2012 1:09 pm
by arnie on Mon Sep 03, 2012 1:09 pm
i've just started using peel ply and love it. so far just the foot well but think of doing hull pieces, deck etc before assembly. Question: after assembly and filleting is it necessary to add fiberglass tape to seams for strength or is a quick sand and unthickened epoxy enough over seams? cheers, arnie
- arnie
- Posts: 7
- Joined: Wed Aug 26, 2009 6:35 pm
Re: Need help breaking the "fiberglass code"
![]() by Shudoman on Tue Sep 04, 2012 10:54 am
by Shudoman on Tue Sep 04, 2012 10:54 am
It depends on how the fillet will be stressed. I added tape to areas that I thought would be high load. Like the transom to hull sides fillet and bulkhead number 3 where it connects to the hull and cockpit decking. The manual has you put tape in the setback area between the upper and lower hull sides. I continued with this idea into the cabin. Not sure if I needed it but it makes me feel better.
I also intend on taping the outer edge of the cabin roof where it intersects bulkhead 2. I believe that Tatoo had a failure of this joint.
Good luck,
Bill
http://pocketship.blogspot.com
I also intend on taping the outer edge of the cabin roof where it intersects bulkhead 2. I believe that Tatoo had a failure of this joint.
Good luck,
Bill
http://pocketship.blogspot.com
- Shudoman
- Posts: 144
- Joined: Sun Feb 15, 2009 10:31 pm
Re: Need help breaking the "fiberglass code"
![]() by JonLee on Thu Sep 06, 2012 11:28 am
by JonLee on Thu Sep 06, 2012 11:28 am
I added tape to the forward bulkhead 2-to-hull, aft bulkhead 8-to-hull, and transom-to-hull junctions junctions. Having finished the boat, I'd look back at that and say it wasn't required. But, in utter contradiction to that statement, if I were to do it over again, I'd do it again, plus add some tape (maybe not the 9oz, something lighter) to the floors-to-hull fillets. These could be applied and wet out at the same time as the interior fiberglass, saving sanding and flow time.
- JonLee
- Posts: 195
- Joined: Tue Oct 19, 2010 10:02 am
Re: Need help breaking the "fiberglass code"
![]() by mark48 on Sun Dec 13, 2015 7:43 pm
by mark48 on Sun Dec 13, 2015 7:43 pm
My first use of Peel Ply resulted in a surface still showing areas of fabric; in other words, I had not used enough epoxy prior to application of the Peel Ply. I then sanded the surface (although I believe that sanding after Peel Ply is not necessary because the epoxy layer under the Peel Ply has a microscopically roughened texture suitable for further adherence). In any event, I have now applied more epoxy. My questions for all you PS builders:
1) I must sand this second epoxy layer until the surface is all dull (i.e., sand the shiny spots away). Does that mean even those last remaining pin-prick shiny spots after the surface is generally dull?
2) Sanding (especially if I sand until ALL the pin-prick shiny spots are dull) results in some areas of visible fabric (especially if wiped down with denatured alcohol) although I do not feel the weave. Does visible fabric indicate need for an additional layer of epoxy?
3) And I presume that if - after sanding - I find areas on a large flat surface (e.g., transom, side panels) that require more epoxy, I must apply it to the entire surface, not just the needy spots...right?
Thanks everyone,
Mark
- mark48
- Posts: 157
- Joined: Fri Jun 28, 2013 9:55 pm
Re: Need help breaking the "fiberglass code"
![]() by ddemasie on Mon Dec 14, 2015 12:43 pm
by ddemasie on Mon Dec 14, 2015 12:43 pm
Hmmm...
This is just my opinion and practice:
From your description - I think you are actualy putting too much epoxy on in the first coat. I believe that if you do it right, after applying the first coat of epoxy, the fiberglass cloth should become transparent, but the point of the first coat is not to make it completely smooth to the touch, but just to form a strong bond between wood, cloth and epoxy. My first coat is always thin enough that after curing, I can still feel (and see) the weave of the glass if I rub my hand across it. it ddoes become transparent, ut you can still see that it is cloth. The second and third coat of epoxy 'fill the weave' and provides the additional strength.
I think that youe experience of seeing the weave of the fiberglass cloth is in places where you have put on too much epoxy, and the cloth is 'floating' on top of a layer of epoxy, and no longer making direct contact with the wood.
I do my first 'wetting' in one thin epoxy coat - just enough to adhere the cloth to the wood, then add 2 thicker coats in succession to add the depth and additional strength to the finished product.
I generally try to add the second and third coats within 12-24 hours of the first. Timing here is approximate and sometimes hard to control (since I have a regular job and cannot always approrpiately schedule epoxy coat timings), but the idea is that you want to get the second and third coat on before each previous coat fully cures (definitely within 24 hours) so you get a good chemical epoxy bond between the coats.
I only sanded between coats of epoxy if I had to wait over 24 hours between coats (or sooner during the summer when it is warmer and the epoxy tended to cure very quickly) - and sanded just enough with 80 grit to get a basic 'dulling' of the shiny, slick top layer of the cured epoxy. Doing that helps the new layer bond mechanically to the more fully cured layer of epoxy.
So - no, I did not generally sand my interim epoxy layers down to the uniform dullness needed for painting, though I did try to get most of the 'spikes' from cured epoxy cut down with a small hand held stainless steel blade that I bought from CLC for this exact purpose - look on the CLC website for them - great investment and a necessary tool.
Dennis DeMasie,
Aurora, IL
Aurora, IL
- ddemasie
- Posts: 78
- Joined: Tue Sep 03, 2013 9:51 am
Re: Need help breaking the "fiberglass code"
![]() by ddemasie on Mon Dec 14, 2015 12:54 pm
by ddemasie on Mon Dec 14, 2015 12:54 pm
Oh - on your third question:
I do not believe it is always necessary to coat the entire surface with epoxy if you are doing such a repair as you describe. In my experience, the final cured epoxy is sometimes uneven in how it finally cures, based on cure time anyway, and how much the wet epoxy 'flows' or 'pools' after application. If I needed to fill a low spot - or just add epoxy to a place where I sanded too aggressively, I found it very acceptable to just apply a top coat of epoxy in a small area, and 'feather' it out like you would doing touch-up painting on a house.
The more uniform you can get the depth of the epoxy over a large area, the less you have to sand out 'high spots' - so feathering in small areas can work effectively.
Dennis DeMasie,
Aurora, IL
Aurora, IL
- ddemasie
- Posts: 78
- Joined: Tue Sep 03, 2013 9:51 am
Re: Need help breaking the "fiberglass code"
![]() by riverron on Mon Dec 14, 2015 1:52 pm
by riverron on Mon Dec 14, 2015 1:52 pm
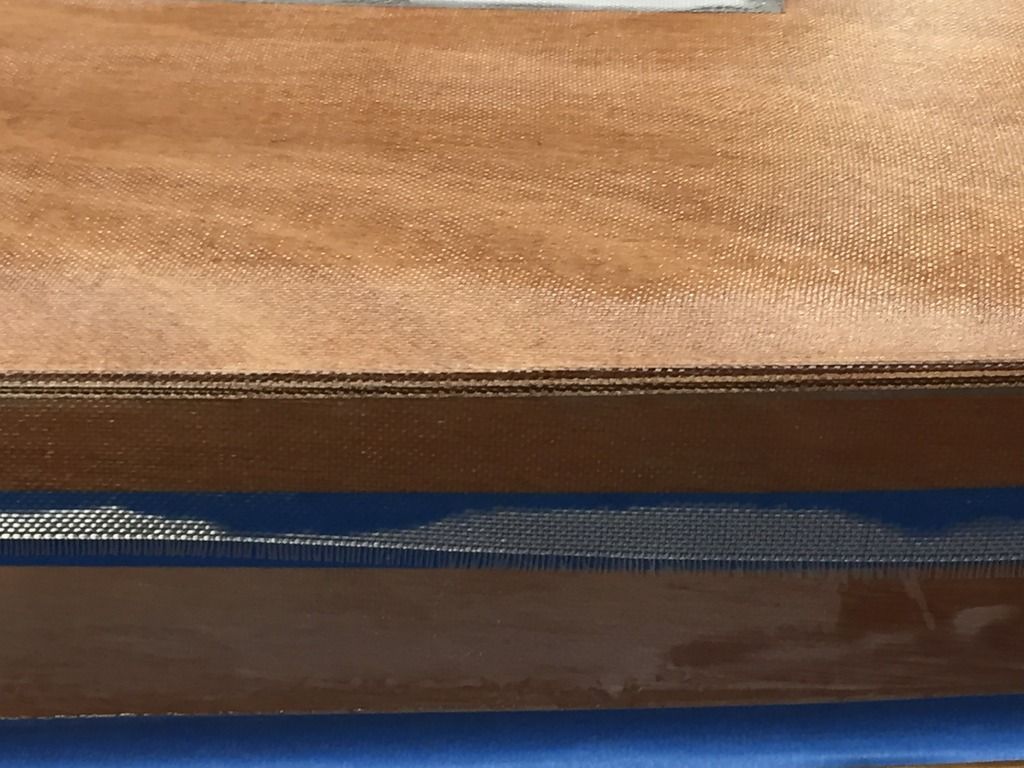
I attended the CLC Winter Open House this past Saturday. Had a great time. They did a couple seminars on Fiber Glassing. Below is a picture of how the fiber glass should look after the first coat. It also shows how to do the tape method to get the clean line. Notice that the epoxy is barely over the tape to be cut away later. Hope this helps.

- riverron
- Posts: 256
- Joined: Fri Aug 07, 2015 10:29 am
- Location: Richmond Virginia
Re: Need help breaking the "fiberglass code"
![]() by mark48 on Tue Dec 15, 2015 9:20 pm
by mark48 on Tue Dec 15, 2015 9:20 pm
Thanks for the replies, input and photos.
I don't think I had too much epoxy on the initial layer. I was using Peel Ply (intending to minimize sanding and serial further epoxy layers) and I have it on good CLC authority that my problematic result is secondary to insufficient epoxy under the Peel Ply. So now I am sanding to achieve a good mechanical bond prior to subsequent epoxy applications, and my questions involve whether the entire surface must be sanded to be free of even the smallest shiny pin-points of epoxy prior to new epoxy, and whether one must apply epoxy to the entire panel or just whatever "low" spots appear after sanding.
I'll keep studying the forum posts. My thanks to everyone for their posts and blogs. Very helpful.
Season's Greetings,
Mark
- mark48
- Posts: 157
- Joined: Fri Jun 28, 2013 9:55 pm
Re: Need help breaking the "fiberglass code"
![]() by jwv630 on Wed Dec 16, 2015 6:30 pm
by jwv630 on Wed Dec 16, 2015 6:30 pm
Hi Mark
I was at CLC's Winter Open House last Saturday also. Pocketship's designer and CLC's owner, John Harris, did a fiberglass demo using peel ply. He emphasized the importance of using about 10% more epoxy than usual when putting down the fiberglass/epoxy layer. Then place the peel ply over it, get the peel ply smoothed out, pour a little more epoxy onto the peel ply; then use a squeegee to press the peel ply down onto the fiberglass.
Sanding: At this point, I don't think it's necessary to sand to the point of getting the 'smallest shiny pin-pricks' of epoxy since you'll be adding subsequent layers of epoxy. Consider a good scuff/light sanding to get the surface generally level and smooth. After the last epoxy application has cured is when to add some elbow grease. If you're a perfectionist, yes, go to the 'pin-prick' level after the last coat - but for me, something close if fine.
For low spots, just hit 'em; don't think it's necessary to do whole panel.
If you're ever really stuck, email John Harris directly; or call the CLC tech guys. They've always been very welcoming and generous with their time when I've a question.
By the way, I've found that hitting the last coat of epoxy right after application with a hair dryer helps to reduce the peaks/valleys and saves sanding time. Good luck!
Jimmy V
Victory II
- jwv630
- Posts: 141
- Joined: Sun Nov 22, 2009 4:12 pm
21 posts • Page 2 of 3 • 1, 2, 3
Who is online
Users browsing this forum: No registered users and 64 guests