Page 2 of 3
Re: Installing rub rails: tips? Tricks?

Posted:
Fri Oct 03, 2014 10:28 pmby craig
I assume you are talking about at the bow,where the bend is the most severe? I had trouble there too. I recommend (what I did) was to pre-bend the rail and temporarily secure it with a huge 3" drywall type screw through the plywood and into the lower breasthook. I then proceeded to slowly secure the rail with drywall screws working from the middle of the boat towards the bow. Be careful when you remove the temporary big screw because, if there aren't a couple of screws around it, the rail will pop off with a soul-crushing pop (yes, I speak from experience). Installing the rail took me a week or so: each layer took two days to bend into shape and for the epoxy to set. Kinda a pain.
Re: Installing rub rails: tips? Tricks?
Posted:
Fri Oct 03, 2014 10:54 pmby truenorth
Yep - at the bow. My wood isn't splitting. It's not holding to the bow.
When you say pre-bend, can you detail? Do you mean steam/heat off the bow? Or heat and then drill/screw into the lower breasthook? I assume you then removed the screw (and the rail now has the shape)?
Re: Installing rub rails: tips? Tricks?
Posted:
Sat Oct 04, 2014 7:13 amby craig
By pre-bend I don't mean using steam or heat to force the wood into a different shape. I mean just pushing the rail by hand until it is approximately curving around the boat at the right place, then screwing it in temporarily at the bow to hold it in place. Then I worked from the middle toward the bow screwing in the rail, making sure it made a fair curve. By the time I got to the bow, I removed that large temporary screw and slightly adjusted the final position of the rail there to get it perfect.
Re: Installing rub rails: tips? Tricks?
Posted:
Sat Oct 04, 2014 7:18 amby hood
I made strips of oak. front of about 1.5 m wrapped in a towel and doused with boiling water. Then I clung to her desk in an arc and let dry overnight
Re: Installing rub rails: tips? Tricks?
Posted:
Sat Oct 04, 2014 12:00 pmby Bflat
I haven't installed the rails yet so my opinion is just that, but it seems it would be helpful to have 18 inches or more of extra rail stock sticking past the bow that could be pulled with ropes and such to help hold the curve while the glue cures.
Re: Installing rub rails: tips? Tricks?
Posted:
Sun Oct 05, 2014 7:58 pmby truenorth
Happy to report I got the first layer of the starboard rub rail on this evening. I spent a couple hours yesterday bending the first few feet or so into a rough curve with a heat gun then some water then some more heat on my living room floor. I took some photos I'll post another time. It gave it about a 12" curve, just enough. But the key to it (thanks Craig) was to drill a deep hole into the lower breasthook to secure the most severe part of the bend. I then worked aft, using 1 1/2" deck screws (not dry wall). These have nice, course, grippy teeth. Given this is the first layer, I didn't worry as much about holes as this will be covered by two more layers. The downside is I have about 18" or so of the rub rail sticking out of my garage so I can't close the door until it cures. Hopefully no one notices the boat as they drive past the house....
Re: Installing rub rails: tips? Tricks?
Posted:
Mon Oct 06, 2014 1:11 pmby craig
Great! Glad that worked. The hard part is done now, soon you'll be flipping the boat. And sanding yards and yards of fiberglass! Yipee! ha. (I think I'm slowly going insane with all the sanding)
Re: Installing rub rails: tips? Tricks?
Posted:
Wed Jun 10, 2015 11:20 amby DanaDCole
I also did some pre-bending with a heat gun. Worked pretty well, but what enabled me to easily get those last few inches down tight at the bow was to run a tie-down strap (actually two hooked together) from the rub-strip section at the bow all the way back and across the transom, and hooking it to the other end of the same strip. This made things really easy once I got the strap in place (a lot easier with someone to help). It also helps to make sure the very end of the strip is down tight at the stern.
I did the first couple strips before a neighbor came up with the strap idea, and I was having to put a lot of extra screw holes in the last few inches at the bow. Even with deck screws, there was so much pressure that some of them stripped out the wood. Looked messy and the strip was still between 1/16 and 1/8" away at the very end--screws too close to the end might have split the wood and might not have been able to pull it in anyway. I wish I had thought of the strap idea and used it all the way through--would have worked perfectly and not have needed all those extra screws (a few of which broke off when I tried to remove them. (It turned out that the strip was twisted a little at the end so was touching at the bottom, so I just had to do some filling with thickened epoxy. Not sure the straps would have been able to flatten out that twist, but maybe they would.)
I suppose if you are really good at heat bending, and/or have a steam box, you could get a perfect match for that curve, but why bother when the strap method works so well, and easily. Just do some pre-bending with a heat gun to take some of the strain off. You'll be thrilled to see how easily the tie-down straps pull the rub-strip right up to the hull.
Re: Installing rub rails: tips? Tricks?
Posted:
Sat Jun 13, 2015 10:01 amby John in CC
The only problem for the bend was the last few feet at the bow.
You can just see the red ratchet strap at the tip of the bow in the picture I used to hold everything together.
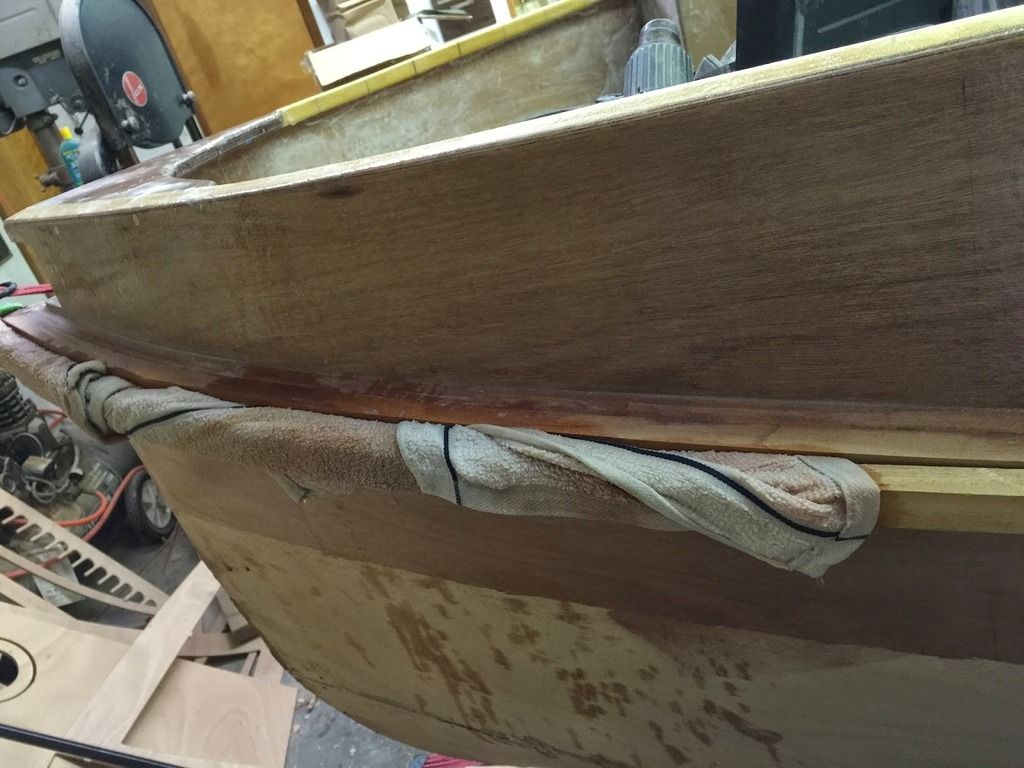
I boiled some water and poured it into a bucket with a towel in it. I took out the towel with a pair of tongs and wrapped it around the end of rail. The rail then easily made the bend around the bow. Then waited with the rail tied off for about 20 minutes and took the towel off. Once the rail was dry I had no problems screwing it in place.
Oh and it first one (layer) is the hardest because the material gets thinner on each layer.
Re: Installing rub rails: tips? Tricks?
Posted:
Sat Jun 13, 2015 2:06 pmby DanaDCole
From what I can see it looks like you are using a strap also. As I said I used the hot-towel method also, but I did it off the boat so didn't get the bend quite right. It looks to me like combination hot-towel and strap is the best way to go.
One other thing is that my rails don't quite touch at the stern where I had rounded off a bit. I think that even if I used the above method it still would have been a good idea to put the strap on after gluing and run it from front to back. That pull on the stern rail should bring it in a little closer to the curve. (Or else don't round that section.)