Helpful home-made jigs for building Pocketship

Welcome to PocketShip.net! This bulletin board is for builders of the Chesapeake Light Craft-John C. Harris "PocketShip" design, a 15-foot micro cruiser sailboat built from a kit or plans.

For more information on PocketShip, click here: http://www.clcboats.com/pocketship

This site gathers PocketShip builders in one place. Here you can share photos, tips, questions, and---eventually---your sailing adventures in PocketShip! CLC will also post design updates and tips here as they come up.

We'll try to knock down spam as quickly as possible.

Moderator: John C. Harris

Forum rules
Spam or commercial posts will be deleted.
This is a civil forum: no flames or drunken tirades.
Please stay on-topic.
PocketShip's Web Page: http://www.clcboats.com/pocketship
If you need CLC customer service: http://www.clcboats.com/forms/contact_us.html
We'll try to delete spam as soon as it appears.

Helpful home-made jigs for building Pocketship

Postby craig on Thu Oct 23, 2014 10:04 pm

I will reply to this post with a series of detailed write-ups for jigs that I have made and used during construction of my Pocketship. I realize these are probably very basic and well-known to most of you; rather, these are intended for a woodworking beginner like I was when I started this project. I wish I could have seen this list written down in one place, and hope it will help aspiring boatbuilders in the future. None of these jigs are my original designs; all are described online in various places, and were simply adapted to fit my materials and needs.


Lumber scarf joint circular saw jig

This jig will cut a beautiful scarf joint (say, for the rub rails) with a circular saw. Screw down two strips of wood (maybe 1.5inch high by 12inches long) parallel to each other in a plywood base. Then, screw a second piece of plywood on top of the lumber strips. This forms an enclosed channel where you will insert the wood to be cut, which will be placed firmly against the right-side lumber. You can either screw the wood into the plywood base, or use wedges placed next to the lumber to hold it in place.

20141019_215128606_iOS.jpeg
20141019_215128606_iOS.jpeg (201.09 KiB) Viewed 4991 times

20141019_215200011_iOS.jpeg
20141019_215200011_iOS.jpeg (232.12 KiB) Viewed 4985 times

On the top piece of plywood, screw or glue in two strips of lumber that will act as guides for your circular saw. The saw will run tightly within this channel, cutting a perfectly straight line. The angle of your channel (and hence, the angle of your cut) will be determined by your scarf joint size. For scarfing pieces of lumber as we are doing here, you probably want 1:10. So, measure back 10” from the end of the right-side lower piece of lumber, then 1” out from that. This makes a right triangle of base 10 and height 1. Connect the ends to form a triangle, and align your channel so that the saw blade cuts directly on that line (the blade kerf should be to the LEFT of the line, since we want to keep everything to the right of the blade). Screw down the channels securely.

Make sure you set your blade depth to not cut deep into the plywood base.
Titania, launched January 2015
craig
 
Posts: 284
Joined: Fri Feb 21, 2014 1:04 pm
Location: Chapel Hill, NC

Re: Helpful home-made jigs for building Pocketship

Postby craig on Thu Oct 23, 2014 10:17 pm

Router circle-cut jig

Cutting a perfect circle is necessary in a few places on Pocketship: portholes, porthole flanges, centerboard trunk, etc. I used this jig to cut a perfect circle with a plunge router. If you don’t have a plunge router, you could try it with a regular router, but in that case raise the bit above the wood surface before you turn the router on, and then slowly turn your adjustment knob to lower the bit until you reach the depth you want.

First, you will replace your router’s plastic base with a new one made from plywood. Cut a length of plywood approximately the width of your router base and a foot long. Unscrew the plastic base from your router and place it at one end of the plywood. Carefully mark where the screw holes are, and drill out with a thin drill bit. Use a wider drill bit to countersink these screws so they will not protrude from the plywood (you want the base of the router to be flat across, not bumpy with exposed screws). Make sure to not drill completely through the plywood. Also cut out the middle circle for the router bit. Screw the new base onto your router.

20141023_133349786_iOS.jpg
20141023_133349786_iOS.jpg (244.06 KiB) Viewed 4972 times


The jig will cut a circle by revolving around a pivot point. For the portholes, I cut a circle of 6” diameter, or 3” radius. Measure 3” from the edge of the router bit and drill a hole in the plywood base at that location. You can see all the holes I’ve drilled in my jig. My router was too wide, so I drilled through the plywood into the router base where there was a void in the metal frame; the screw could only go in half an inch, but that’s all you need. Then, drill a hole in the wood you want to cut a circle out of. Remove the drill bit from your drill and push it through the finish piece of wood and through the router jig. The router should then pivot around that location. When cutting, the router should remove material from OUTSIDE the circle, so the finished piece is the diameter that you want.

20141019_211932866_iOS.jpeg
20141019_211932866_iOS.jpeg (213.53 KiB) Viewed 4946 times


Your finished piece will have the pivot point hole in the center, so I cut a template from 1/2 inch plywood and used a flush-trim router bit to cut out the acrylic porthole widows. To cut out the porthole flanges, I first cut out a circle of diameter 6inches (porthole size) plus .5inches flange on each side, for 7 inches total. The inside of the flange should be .5 inches into the window, or 5-inches diameter (these measurements are examples only. I can’t remember what I used. Look at the plans for the official dimensions). I measured on my router jig 2.5 inches from the OPPOSITE side of the router bit and drilled a hole in the router jig at that spot. You are measuring to the opposite side of the bit, because this time you want to remove material to the INSIDE of the circle, not the outside (you want to keep the outside material, because that is your flange!) Use a screw to temporarily anchor the inside of the circle so the whole thing doesn’t rotate as you spin the router. In the end you will have a small waste circle in the inside and a beautiful flange on the outside.

20141019_211944605_iOS.jpeg
20141019_211944605_iOS.jpeg (204.24 KiB) Viewed 4967 times


To cut out the porthole openings, I made a “reverse template” from scrap OSB. The hole should be a shade larger than 6” to fit the acrylic I cut, so I again measured from the OPPOSITE side of the router bit 3”, and cut out the circle. The resulting hole was perfectly sized to fit my acrylic window. This was then screwed onto the side of the boat and a flush-trim router bit used to cut out a perfect circle from the inside.
Titania, launched January 2015
craig
 
Posts: 284
Joined: Fri Feb 21, 2014 1:04 pm
Location: Chapel Hill, NC

Re: Helpful home-made jigs for building Pocketship

Postby craig on Thu Oct 23, 2014 10:31 pm

Water level
One of the ways to mark the waterline on your boat is by using a water level. This tool consists of a long length of clear plastic tubing filled with water. Because water always finds its level, you know that the water within the tube will always be level at both ends of the tube. Jon posted an excellent writeup earlier on this forum about how to mark the waterline on the boat that was the basis for this design.

There are two versions. The first is easy: just a tube filled with water, but this requires a helper. As one end of the tube is raised, the water level changes at both ends, meaning you will need to communicate and adjust the tube each time you mark a point so that you are maintaining the same height for each point.

The second version is only slightly more complicated but easier to use, and you don’t need a helper. First, you need a clear plastic tube. Wider diameter tubes are better, maybe half an inch ID, but I used a quarter inch and that works well. You also need a bucket of some sort. A large volume and large surface area is better. The bottle I used is rather small (the screw top was not on tightly - you don’t want a suction in the bottle). Fill the bucket with water (mixed with dish detergent to lower water surface tension) and siphon the water through the tube, making sure to get ALL air bubbles out. Air is compressible and bubbles will ruin the accuracy of the level. Food coloring can make the waterline easier to see. Gently clamp the submerged tube end to the bucket so it won’t come out of the water (make sure water can still flow freely through the tube).

Position the bucket so that the water surface inside is level with your waterline. On Pocketship, that is 16.5 inches above the keel. Measure this distance along the aft edge of the keel. It’s angled, so you need to actually measure 17.25 inches or so down that incline. Anyway, place your water level so that it is perfectly at that height. Put it on a ladder so that it’s close to correct, then place the end of the line up against the boat. Let the water settle and see where the line is. Raise or lower the bucket until the water in the tube is at the correct height - remember, water in the tube will be at the same height as the water in the bottle. Always be sure that you aren’t stepping on the tube, and that no part of the tube is clamped or restricted: water must be able to travel freely within the tube/bucket system. Don’t worry about the tube rising above the water level in the bucket: because you have a continuous column of water in the system, siphon pressure will keep everything equilibrated.

That’s it! You’re done. Hold the tube against the boat at each position you want to mark and wait for the water to stop moving. Larger diameter tubes will equilibrate faster. Measure consistently from the top or bottom of the meniscus (the U-shaped water edge in the tube). Make sure the boat is level! Water finds it’s level, but 800 pounds of plywood and hardened epoxy won’t… a wonky boat will give you a wonky waterline, so make sure to level fore-and-aft and athwartship. Be careful leveling athwartship. My keel is aggressively rounded-over, so I had trouble getting my bar level to sit… level. Double-check your results with the water level to make sure the waterline is the same length above the chine in the middle of the boat on both sides (for me, it was like 1.5 inches or something).

20141023_133427611_iOS.jpg
20141023_133427611_iOS.jpg (204.55 KiB) Viewed 4968 times

Please note that the clamp at the end of the hose is just for storage: while in use, it needs to be removed or the water won't flow properly. Also, don't lower the unclamped hose below the bottle or water will go everywhere. Yes, it happened to me several times...
Titania, launched January 2015
craig
 
Posts: 284
Joined: Fri Feb 21, 2014 1:04 pm
Location: Chapel Hill, NC

Re: Helpful home-made jigs for building Pocketship

Postby craig on Fri Oct 24, 2014 1:44 pm

I have no excuse to offer, but I fail at plywood scarf joints. Other builders seem to have no problem with using a block plane (I’m looking at you, Jon!), but my skills are not sharp enough for that (neither are my tools, apparently). Thankfully, you can do this electrically with a router. (I've seen homemade circular saw jigs, but never tried them).

Warning: this is extremely loud and unpleasant. You will also generate obscene amounts of sawdust.

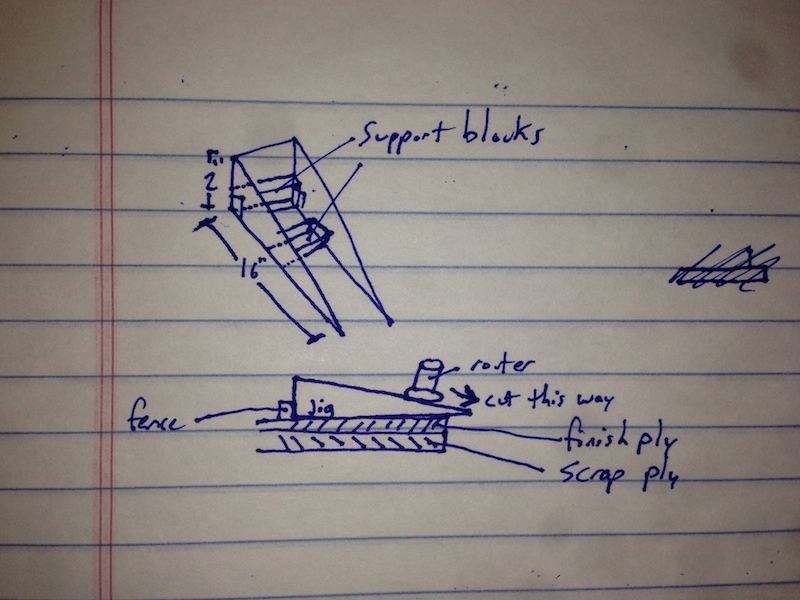
The idea is to build an angled track that the router will rest on. As you move the router, the bit will gradually cut through the wood at an angle, forming that perfect triangular taper.

20141023_145448425_iOS.jpg
20141023_145448425_iOS.jpg (163.6 KiB) Viewed 4943 times


The jig consists of two triangular pieces of wood cut to the appropriate angle depending on your scarf joint. For joining plywood, this is probably 8:1. So, measure some scrap plywood 16” (or more) wide, and 2” (or more) high at a right angle. Connect the lines and cut out your triangle. Now make a duplicate. Use blocks of wood to connect these triangles at the high end so that they are held maybe 5” apart or so. Base this distance on your router size: you want the router to be able to move a bit left-or-right in the channel, but not ever fall off either support. Narrower is better than wider. Make sure to not use any supports near the sharp pointy end of the triangle, since that is where the router will be cutting.

Measure 2” back from the edge of your plywood and draw a straight line across. This will be the start of your scarf joint. Place the triangle jig on the wood so the pointy ends are hanging off the edge maybe an inch or two. Put the router on the incline and make sure that the router bit can lower enough to extend so that it will cut through all the plywood. Then, securely clamp a straight piece of wood to the plywood to act as a rear fence for your triangle jig. This will keep the jig in the correct orientation and prevent it from sliding backwards, which would ruin the calibration with your router bit depth. Make sure this fence is parallel to the edge of the plywood.

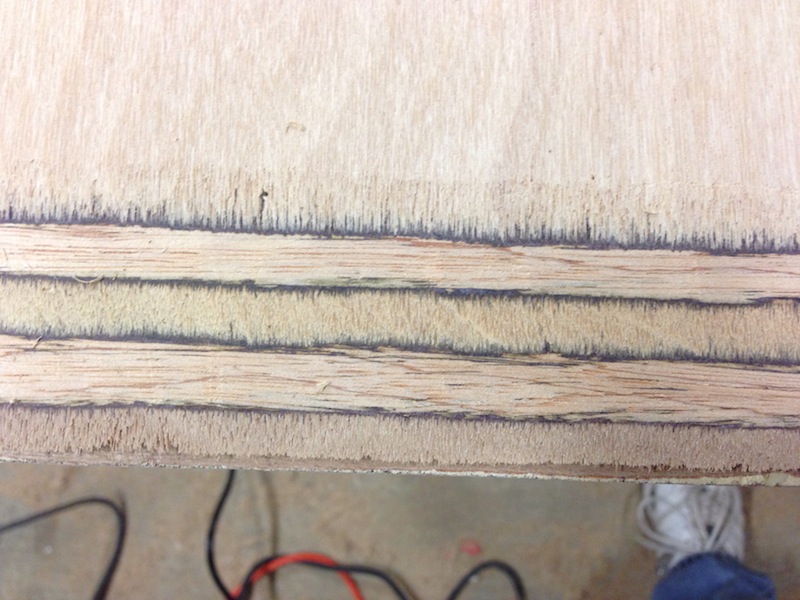
Press the triangle jig firmly against this fence and place a heavy weight on the rear part to hold it down. I used lead blocks. Then, place the router on the jig and lower the bit so that the tip of the bit just touches the plywood where the pencil line is marking the start of your joint. Since the incline of the jig is 8:1, the router bit will then exit the wood at the very end of the piece. Setting the bit deep enough is very important, especially if you are stacking multiple pieces of ply. Your bit needs to cut completely through one piece of ply. If you are not deep enough, your scarf length will not be 8:1, thus weakening your structure. OPTIONAL: If you want, you could raise your bit slightly so that you leave one ply or a half ply of wood at the end of the plywood. This will prevent tear-out of the plywood and give you a nicer edge in case you are varnishing the boat. I was painting, so just filled the tear-out with thickened epoxy, but the joint IS ugly. Keep that in mind. If you leave a thin edge, you must go back over the joint with a block plane or sander to remove the extra material - make sure to remove the same amount of material from across the entire joint so that the incline is consistent and not curved. Curved would be bad.

Now that your router bit is set to the correct depth and the jig is held securely in place, turn on the router and carefully pull it down the incline. Move the router back to the top and repeat. Do this until you get close to the edge of your jig, then move the jig over and continue. This will take a while. The edges are especially tricky since one of the jig sides won’t have anything to rest on. In that case, just do the best you can and gently lift the router up so it isn’t pressing down hard on the jig.

Of course when you are done, you’ll still need to run over everything with sandpaper.

20140323_222906035_iOS.jpg
20140323_222906035_iOS.jpg (145.89 KiB) Viewed 4957 times
Titania, launched January 2015
craig
 
Posts: 284
Joined: Fri Feb 21, 2014 1:04 pm
Location: Chapel Hill, NC


Return to PocketShip Forum

Who is online

Users browsing this forum: No registered users and 29 guests

cron